How To Create Your Online Course | FreshLearn Guide

I've been there. Staring at a blank screen, wondering how to turn years of hard-won knowledge into something people can learn from.
The tech feels overwhelming. The planning feels endless. And somewhere between creating a course and actually doing it, most people get stuck.
Creating an online course doesn't have to be complicated. You don't need fancy equipment, a massive audience, or months of prep time.
You need a clear idea, the right approach, and a platform that doesn't make you want to pull your hair out.
In this guide, I'll walk you through everything. I will tell you why online courses matter, how to structure yours for real results, and how to bring it all together using Freshlearn, a platform built to make course creation genuinely simple.
Some Interesting Online Course Stats
When you teach what you know, you contribute to a growing ecosystem of self-directed learners who are actively seeking out the kind of practical, real-world knowledge that traditional education often misses. According to a survey, 82% of people say what they've learned from creators is not taught in schools.
77% of learners globally, and 91% in developing economies, report career benefits like getting more job offers, interview calls, and promotions after taking online courses. That's real people getting real jobs, feeding their families, and building better lives because someone took the time to teach them something useful.
And the appetite for this kind of learning isn't slowing down. The global e-learning market reached $316.2 billion in 2023, with analysts projecting it to hit $661.6 billion by 2032. People are hungry for skills, and they're willing to invest in themselves to get them.
Benefits of Creating an Online Course
Creating an online course takes effort. You're going to spend hours planning, recording, editing, and refining. So, what's in it for you? Quite a lot, actually. Here's what you stand to gain.
Income that doesn't require your constant presence
The traditional exchange of time for money has a ceiling. You can only take on so many clients, work so many hours, or attend so many meetings before you hit a wall. Online courses break that equation entirely.
Once your course exists, it can sell while you sleep, travel, or work on other projects. You create the product once, and it generates revenue repeatedly. Course creators on platforms like Teachable, FreshLearn, Thinkific, and Kajabi have collectively earned billions.
The income potential varies widely based on your niche, audience size, and pricing strategy, but the model itself offers something valuable: scalability without burnout.
Authority and credibility in your field
There's a reason experts write books. Having a published, structured body of work changes how people perceive you. An online course does the same thing, often more effectively, because it demonstrates not just that you know something, but that you can teach it.
It opens doors to speaking engagements, consulting gigs, podcast invitations, and partnerships that wouldn't have materialized otherwise. Your course becomes a credential, one you granted yourself, backed by the results of your students.
Building an asset you own
Social media followers can disappear overnight if an algorithm changes or a platform declines. Client relationships, while valuable, end when contracts do. But a course? That's an asset.
Your course content, your student list, your testimonials, your curriculum: these belong to you. They compound over time. A course you create today can still be generating income and impact five years from now, especially if you update it periodically.
It's intellectual property that appreciates rather than depreciates, assuming you've built it around evergreen skills or knowledge.
Flexibility in how you work
A course-based business adapts to your life in ways traditional work often doesn't. Want to take a month off? Your course keeps selling. Need to relocate? Your business moves with your laptop. Prefer working in intense bursts rather than steady hours? Course creation accommodates that.
This flexibility matters especially if you're balancing other commitments like parenting, health issues, other projects, or just a preference for non-traditional schedules. Monetizing your knowledge through online courses allows you to stop trading time for money, which gives you the freedom to do whatever you like with your time.
Now that you have a long list of reasons, let’s start creating a course.
How to Create Your First Online Course Using FreshLearn
If you have been hesitating to launch an online course because you are worried about the tech stuff, FreshLearn solves the problem. Unlike clunky legacy platforms that require you to stitch together five different tools, FreshLearn is a true all-in-one platform.
It combines AI course creation, membership management, email marketing, certificates, quizzes, assessments, community building, and payment processing all into a single dashboard.
Best of all, it is designed for beginners and for maximum profitability. FreshLearn lets you sell your courses, digital downloads, and memberships with no commission, so you keep everything you earn.
Follow this walkthrough to build, configure, and launch a professional-grade course easily.
Step 1: Create your course project
The setup phase is crucial because it determines how your course appears in search engines and on your storefront.
1. Access the Creator Dashboard: Log in to your FreshLearn account. On the left-hand navigation sidebar, look for the Products tab.
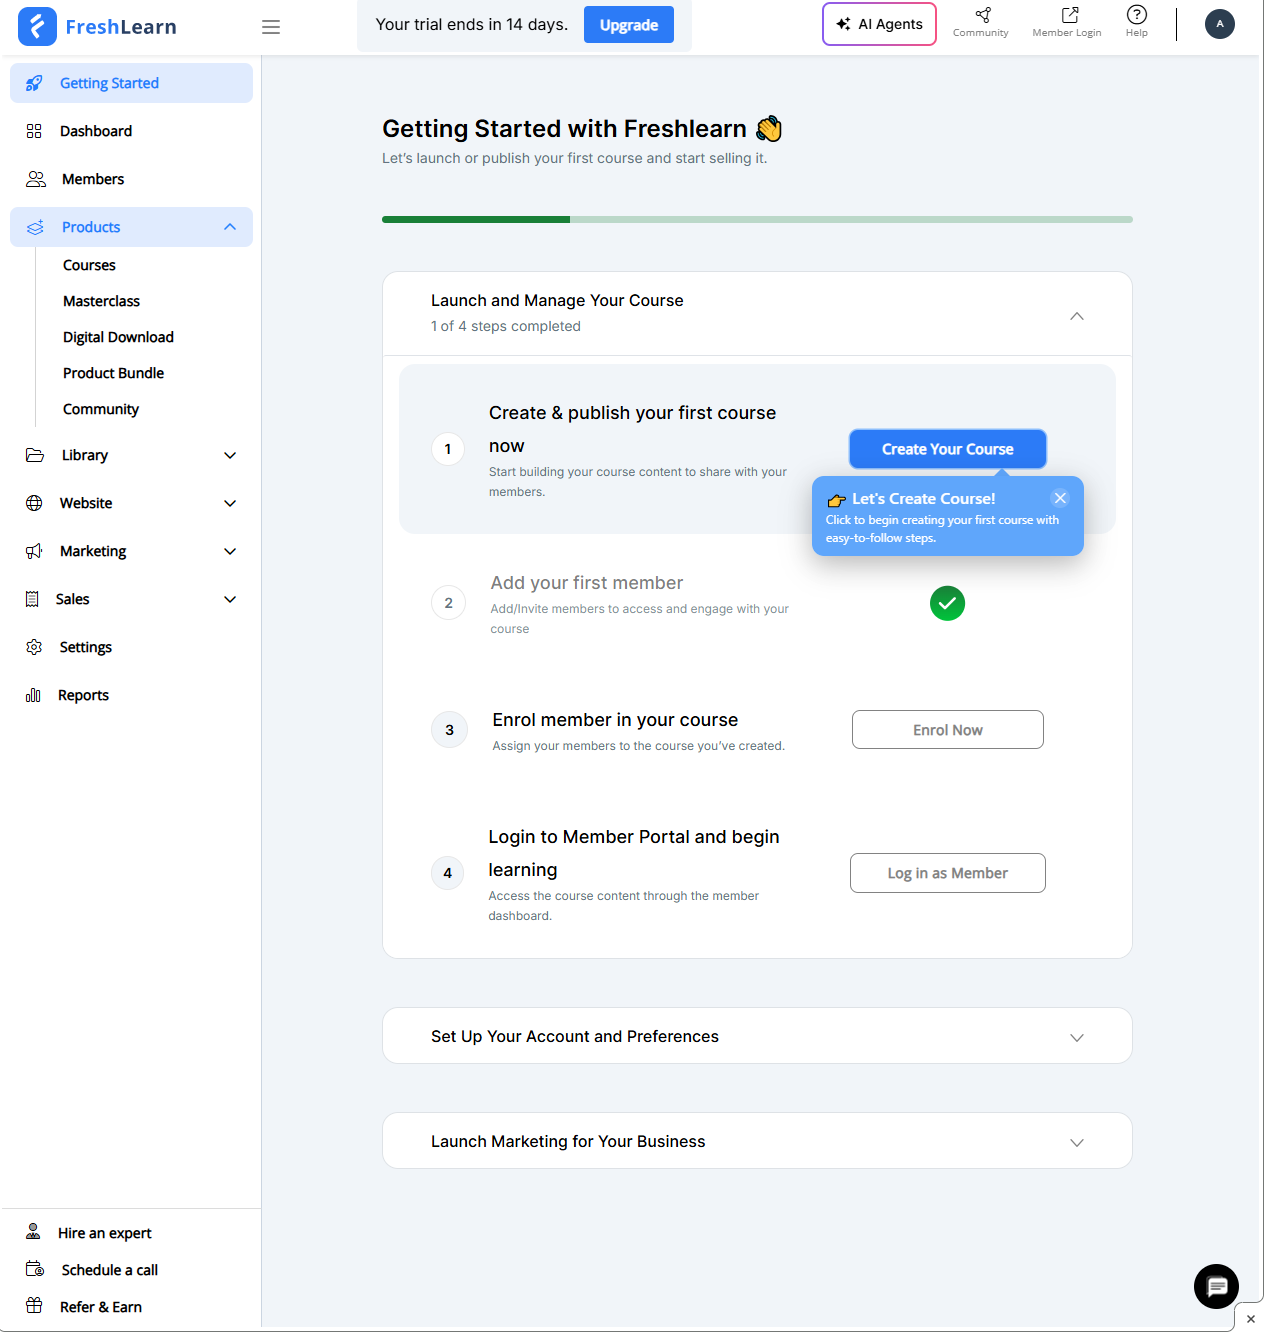
2. Select Your Product Type: Click on Courses. FreshLearn allows you to sell digital downloads and masterclasses, so ensure you are in the "Courses" section to access the curriculum builder.
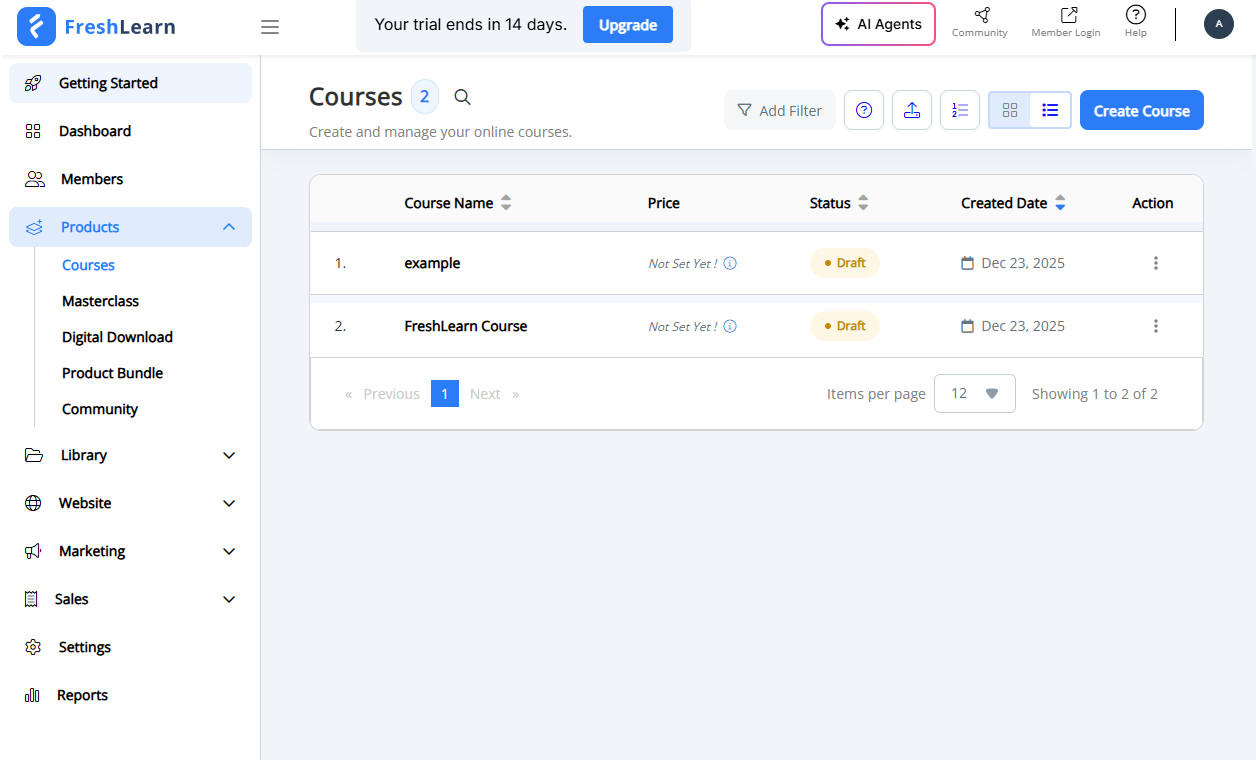
3. Start a New Project: Click the Create Course button (usually located in the top-right corner).
You now have two options to consider. You can either let FreshLearn’s AI Agents generate course ideas and outlines, or you can go the manual route.
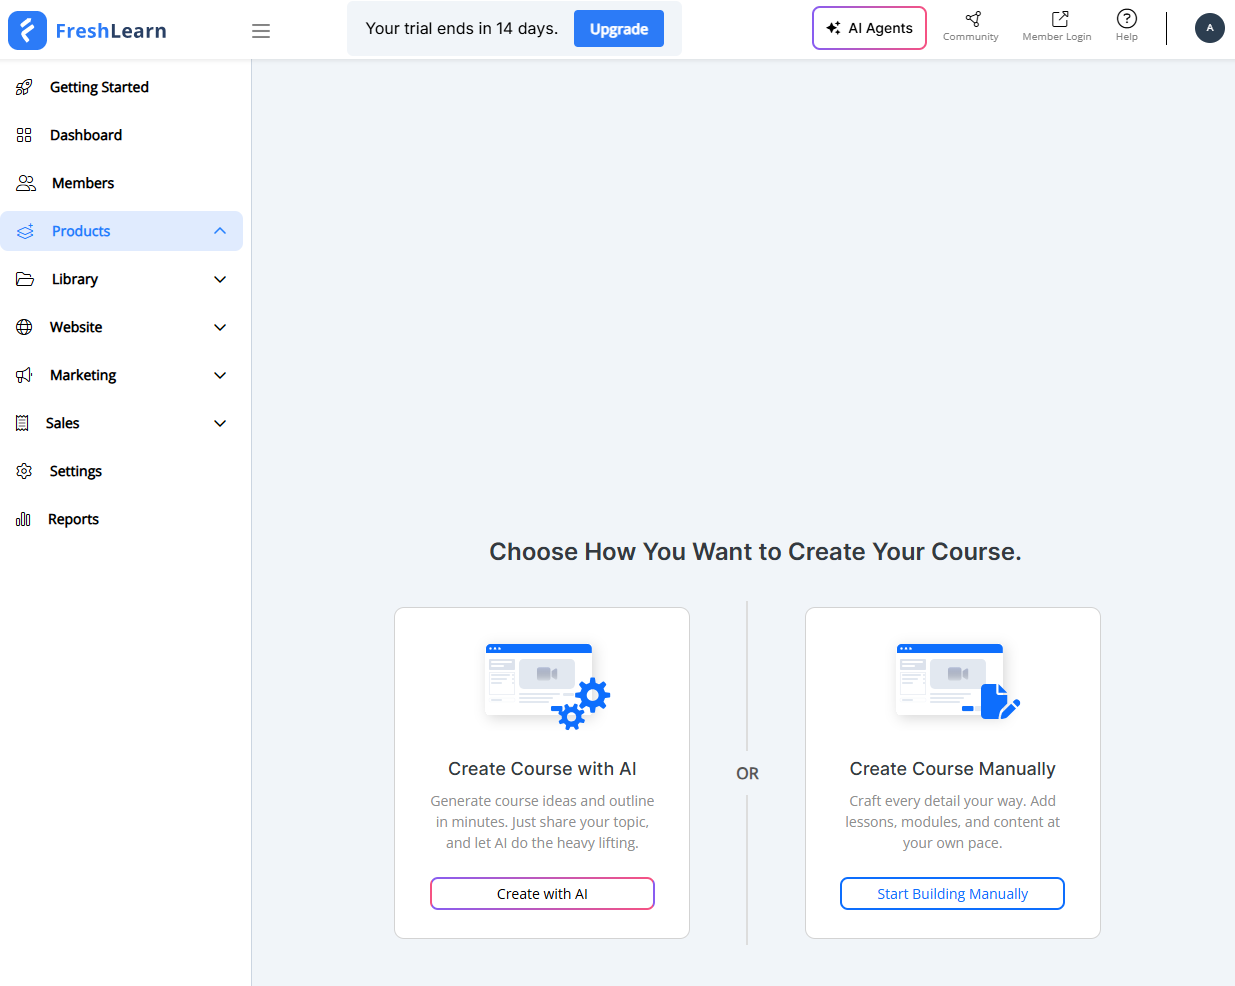
Let’s choose the manual route for now.
4. Configure Core Details: You will be prompted to enter the foundational details.
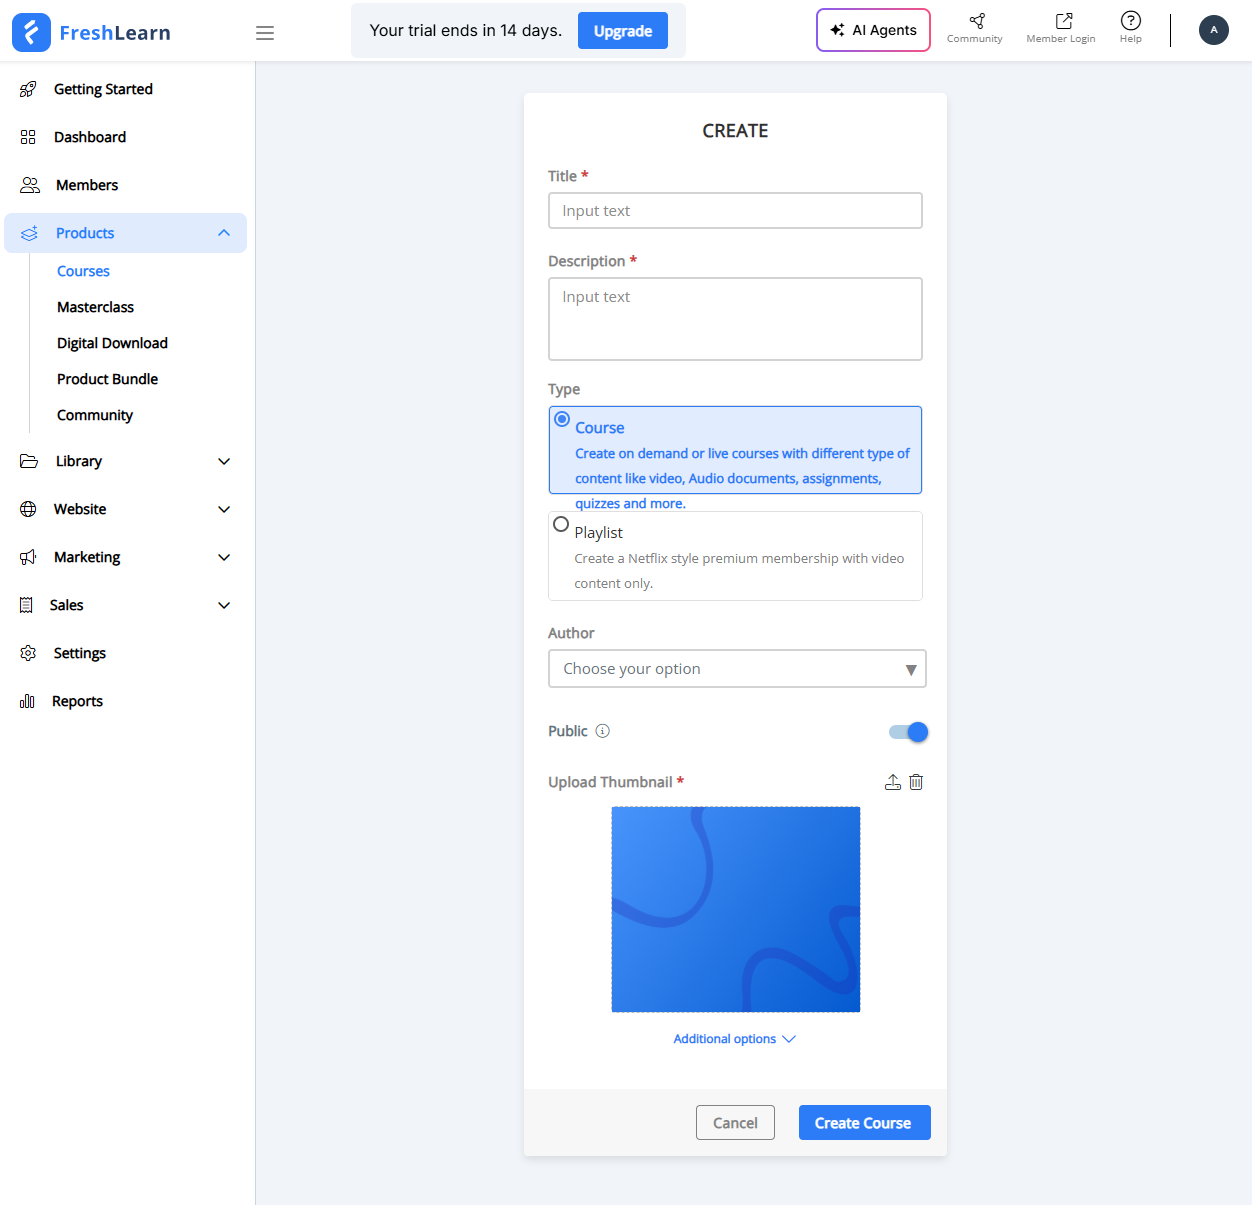
Choose a clear, benefit-driven title (e.g., “Python for Beginners” rather than just “Python”).
Upload your Course Card Image. This is the thumbnail that appears in your store and student library.
Requirement: Use high-quality JPG or PNG files (1920x1080 px is ideal).
Click Create Course. You will be immediately redirected to the Curriculum builder.
Step 2: Create the curriculum
Now that you are inside the course builder, avoid the temptation to upload random files. You need to structure the journey for your students using Modules and Chapters.
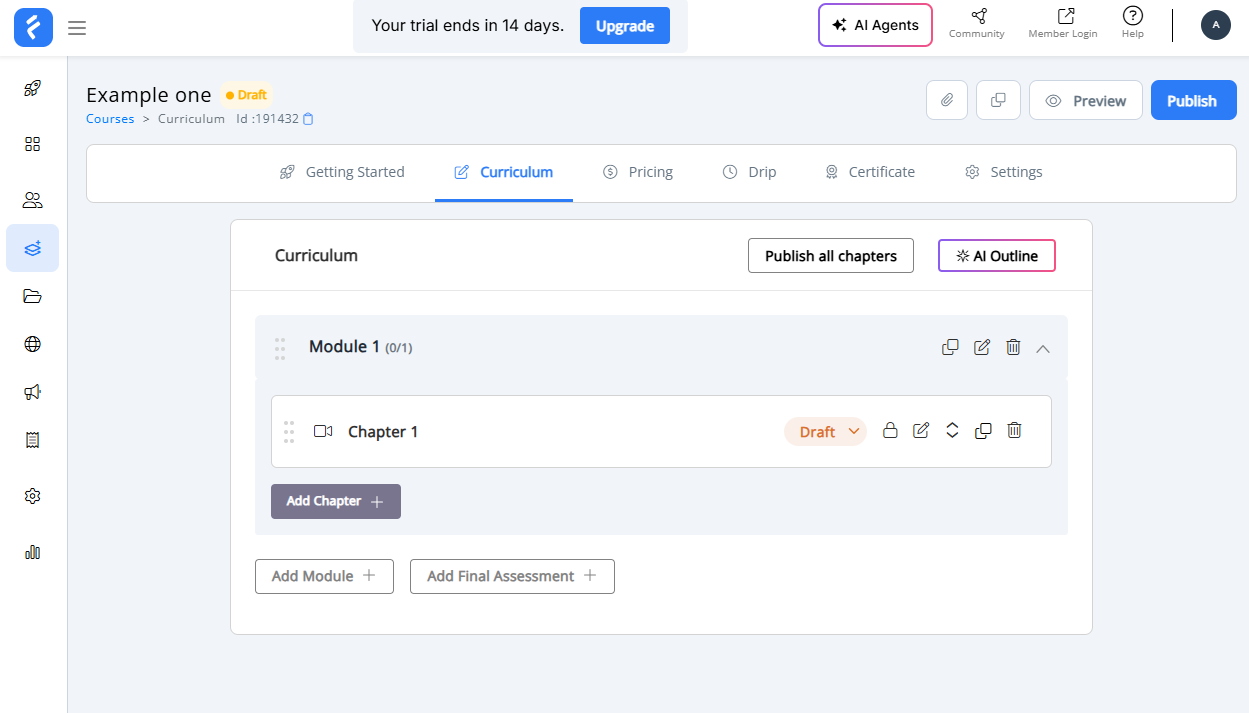
1. Rename the Default Module: You will see a "Module 1" placeholder. Click the Edit (Pencil icon) to rename this.
- Tip: Use descriptive names like "Module 1: The Foundations" or "Module 2: Advanced Techniques." This helps students mentally organize what they are about to learn.
2. Add New Modules: If your course is long, break it down. Click Add Module to create distinct sections. A good rule of thumb is to create a new module every time you switch to a major new topic.
3. Populate with Chapters: Modules are just folders; chapters are the actual lessons.
- Click Add Chapter inside the relevant module.
- Give the chapter a specific name (e.g., "How to install the software").
- Repeat this until your full outline is built.
Step 3: Upload and configure learning content
This is the meat of your course. FreshLearn allows you to mix and match media types to keep students engaged. Click on any Chapter Name to open the content editor.
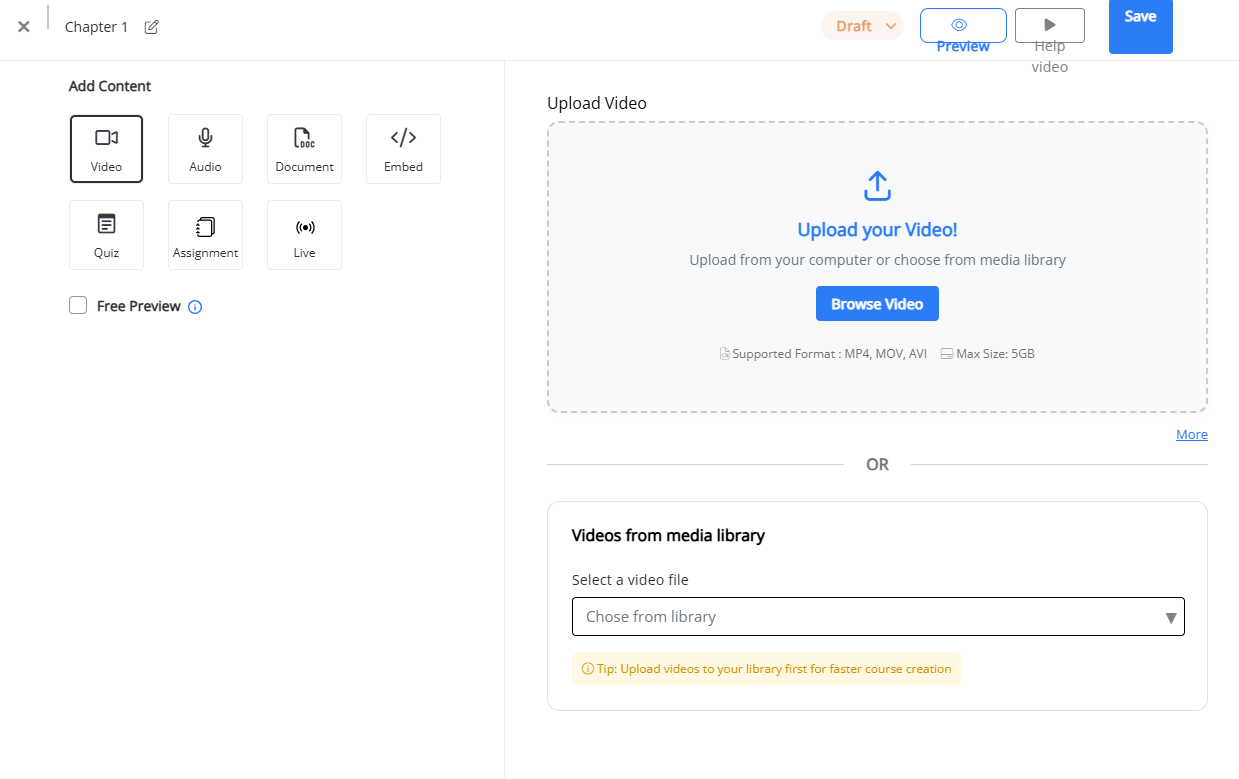
You have several content options here:
- Video Lessons:
- Upload: You can upload files directly (up to 5GB usually).
- Embed: If your videos are already on YouTube, Vimeo, or Wistia, paste the link here to save storage.
- Assessments (Quizzes):
- Select Add Assessment to insert a quiz between lessons.
- You can create Multiple Choice or Single Choice questions.
- Pro Tip: Set a "Passing Percentage." For example, require students to score 80% before they can unlock the next module.
- Assignments:
- Unlike quizzes, Assignments require the student to do work and submit it to you.
- You can ask a question (e.g., "Upload your project file here"), and the student can upload a PDF, image, or document for your review.
- Live Classes:
- FreshLearn integrates with Zoom. You can set a specific chapter to be a "Live Class." When the student clicks this chapter at the scheduled time, they are launched directly into the Zoom meeting.
Step 4: Set up drip schedules (optional)
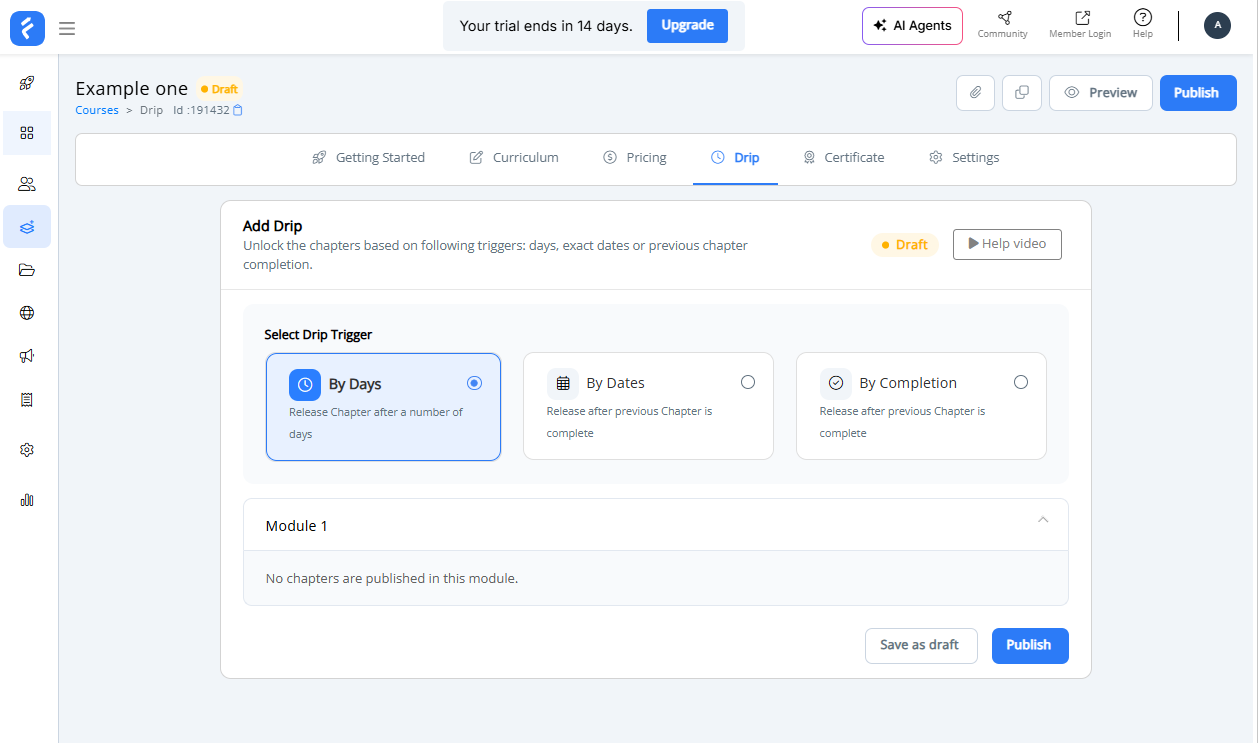
If you don’t want students to binge-watch everything at once, or if you want to force a specific learning path, you can control the flow of content using the Drip tab.
Inside your course dashboard, click the Drip tab (located between "Pricing" and "Certificate").
You will see a section titled "Select Drip Trigger" with three distinct options. Choose the one that fits your teaching style:
- By Days: Best for "evergreen" courses. You set content to unlock a specific number of days after the student enrolls (e.g., "Unlock Module 2 seven days after signup").
- By Dates: Best for live cohorts or semesters. You choose a specific calendar date (e.g., "October 15th") for the content to unlock for everyone simultaneously.
- By Completion: Best for ensuring mastery. This forces students to complete the previous chapter before the next one unlocks, preventing them from skipping ahead.
Once you select a trigger, your Modules will appear below (e.g., "Module 1"). Click on the module accordion to set the specific rules for the chapters inside it.
Click Publish or Save as draft at the bottom to apply these rules.
Step 5: Enable and design course certificates
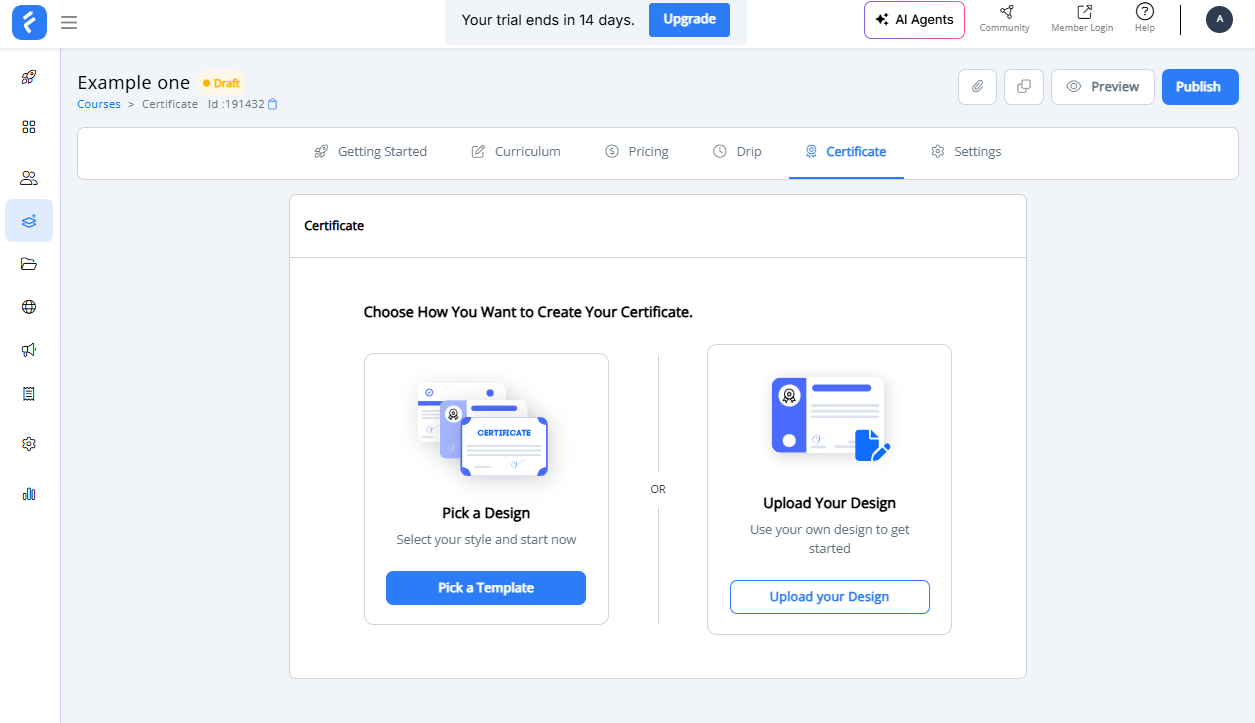
Giving your students a tangible reward upon completion is a great way to boost engagement and course finishing rates. FreshLearn makes this easy by giving you a dedicated workspace to design these credentials.
Inside the course builder menu, click on the Certificate tab. It is located right next to the "Drip" tab.
You will see a screen titled "Choose How You Want to Create Your Certificate" with two distinct options. Select the one that matches your design resources:
Option A: Pick a Design (Templates)
Click the blue Pick a Template button if you want to get started immediately without external tools. This is the fastest route. FreshLearn provides professional, pre-made styles where the student’s name and course details are automatically inserted.
Option B: Upload Your Design (Custom)
Click Upload your Design if you have created a custom background using a tool like Canva or Photoshop. This is the best choice if you have strict brand guidelines and want the certificate to match your company's specific fonts and color palette.
Once you select your path, follow the prompts to preview the certificate.
Ensure the dynamic fields (like {Student Name} and {Date}) are placed correctly so every student gets a personalized experience.
Step 6: Define your pricing strategy
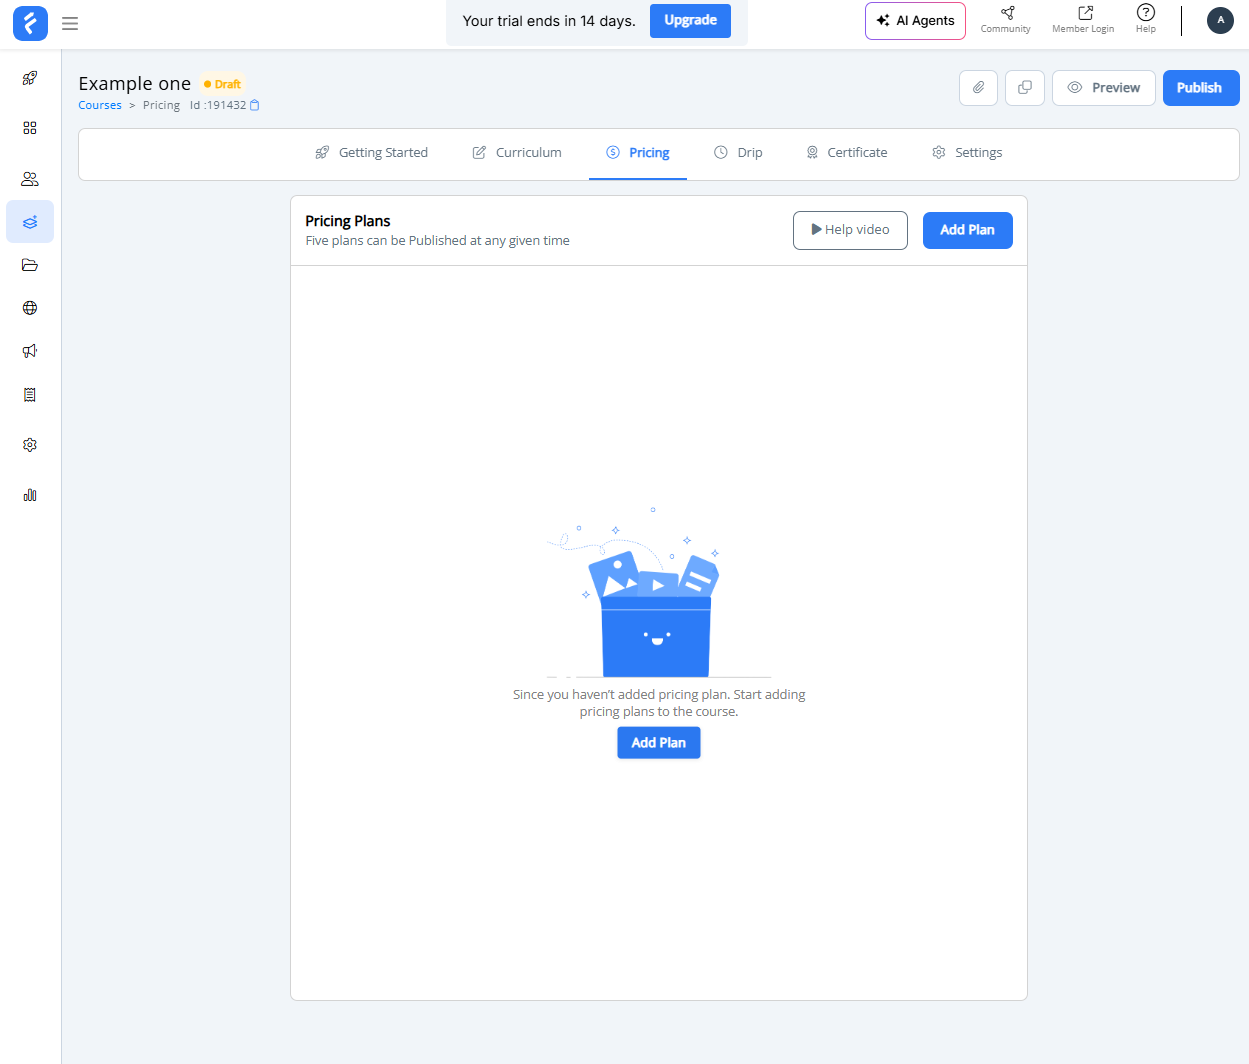
How will you monetize this course? Go to the Pricing tab to set your plans. You are not limited to just one option.
The Pricing tab in FreshLearn is actually a Create checkout page builder. This area handles both the cost of your course and the visual design of the payment form that your students will see.
Start by clicking Add Plan and selecting your model: Free (for lead magnets), One time (for standard access), or Recurring (for memberships).
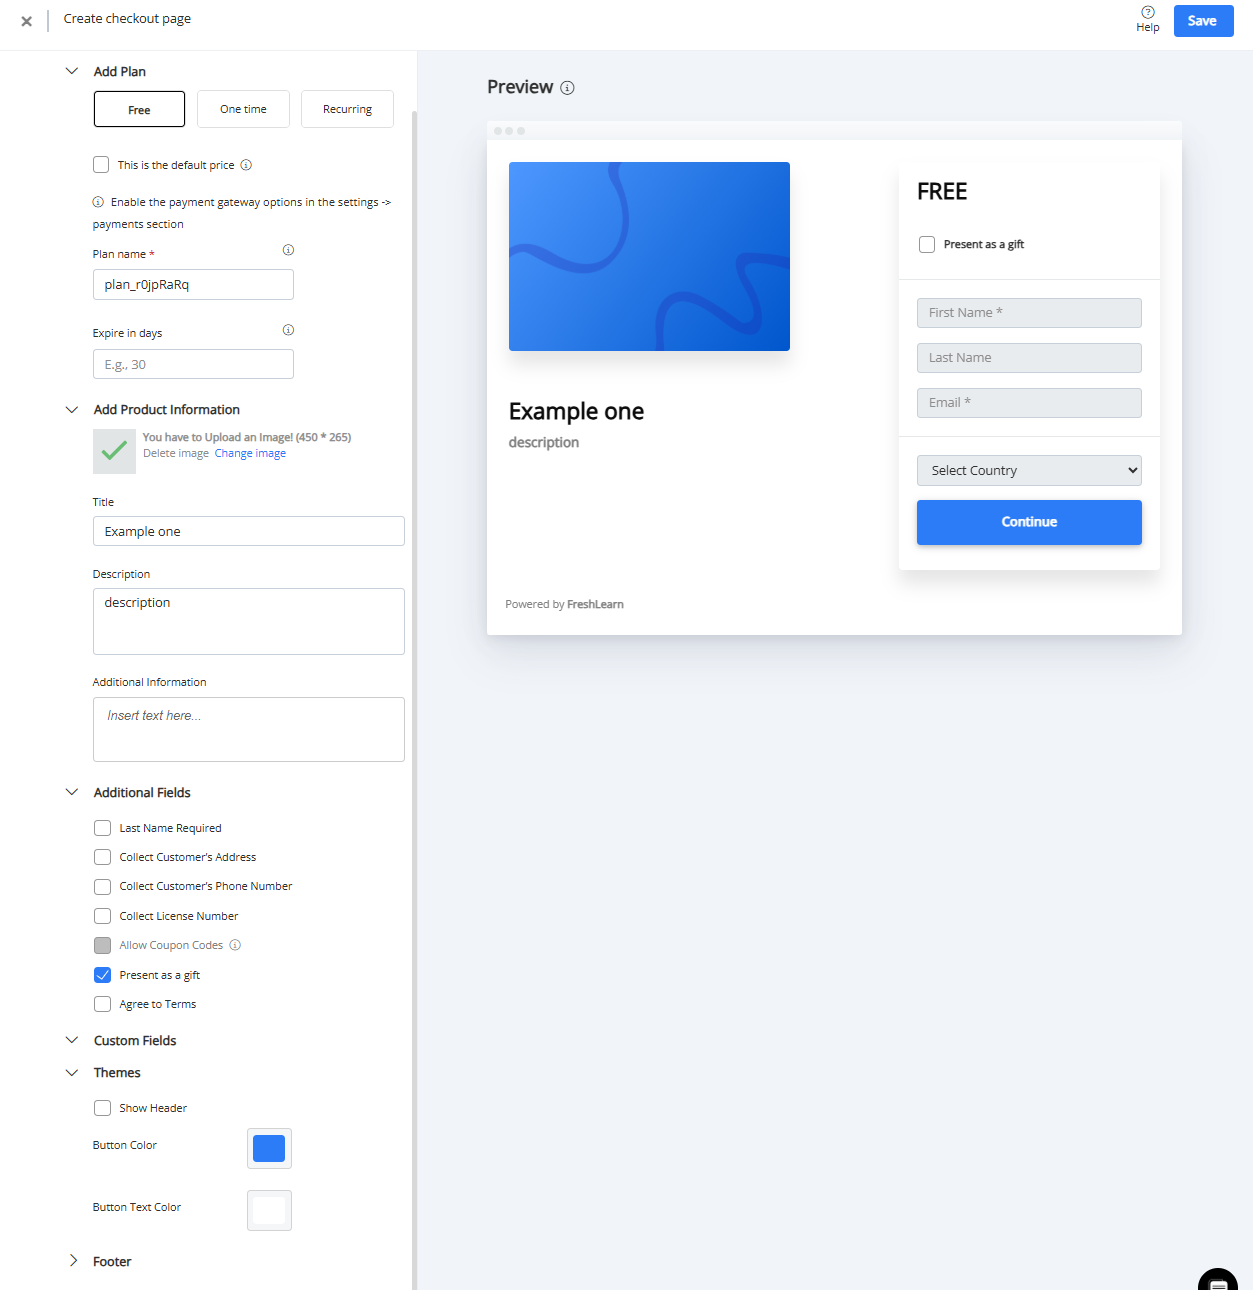
On the left panel, you can customize the data you collect.
Expand the Additional Fields section if you need to capture a phone number or physical address for invoicing.
You can also enable "Present as a gift" to let users buy the course for friends, or "Allow Coupon Codes" if you plan to run promotions.
Finally, expand the Themes section to change the "Continue" button color to match your brand. As you make these changes, the Preview pane on the right will update in real-time, showing you exactly what the checkout experience looks like.
Step 7: Customize the Sales Page
FreshLearn automatically creates a landing page for every course. You need to make it look professional.
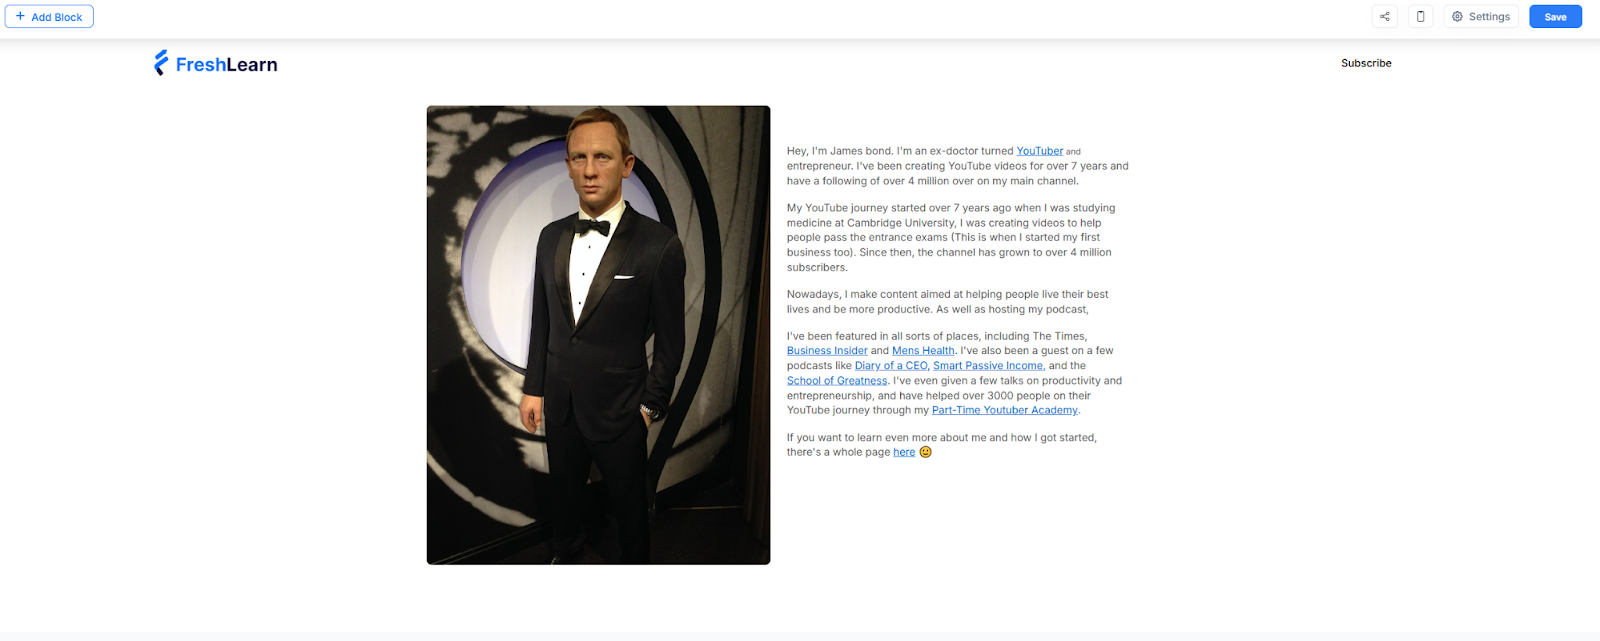
Go to the Pages tab inside your course dashboard. Click Customize on the Landing Page.
This opens the Page Builder. It works on a "Block" system.
- Hero Section: Update the main headline and background image.
- Curriculum Preview: Add the "Curriculum" block so visitors can see the list of modules (the locks will show they are paid content).
- Testimonials: Drag in a testimonial block to build social proof.
- FAQ: Add an accordion-style FAQ section to answer objections before they buy.
- SEO Settings: Click the "Settings" gear icon on the page builder. Enter your Meta Title and Meta Description. This is what shows up when people share your course on Facebook or LinkedIn.
Step 8: Final review and publish
You are almost there.
Use the "Preview" button to view the course exactly as a student would. Verify that your videos play and your downloads function properly. If you have connected an email provider (like Mailchimp or ConvertKit), ensure the tags are set up so new students get a welcome email.
Now, look for the Status toggle (usually at the top right of the dashboard). Switch it from Draft to Published.
Your course is now live! You can copy the link from the dashboard and start sharing it with your audience.
Online Course Creation Best Practices
Creating a course is one thing. Creating one that actually gets results for your students and keeps selling is much harder. Here's what separates courses that work from those that collect dust.
Start with a specific problem, not a broad topic
"Photography" isn't a course. "How to take professional product photos with your smartphone" is. The more specific your promise, the easier it is for the right students to find you and the easier it is for you to deliver real results.
Validate before you create
Don't spend three months building a course nobody wants. Test the idea first. Talk to potential students. Run a pre-sale. Create a simple landing page and see if people sign up for a waitlist. Offer a live workshop version before recording anything.
Confirm demand before you invest serious time. Many successful course creators sell the course first, then create it.
Structure for transformation instead of information
Your students don't want information. They want change. Structure your course around milestones and outcomes, not just topics.
Instead of organizing by "Module 1: Introduction to Email Marketing," think "Module 1: Set Up Your First Automated Welcome Sequence." Each section should end with the student having accomplished something tangible. This keeps motivation high and gives them proof they're making progress.
Keep lessons short and focused
Attention spans are limited, especially for online learning. Aim for lessons between five and fifteen minutes. Each lesson should cover one concept or one action, not three.
If you find yourself cramming too much into a single video, split it up. Students can always watch two short lessons back-to-back, but they'll often abandon a forty-minute video halfway through.
Invest in decent audio
You don't need a professional studio. You don't need an expensive camera. But you absolutely need clear audio. Poor sound quality is the fastest way to lose students, no matter how good your content is.
A simple USB microphone and a quiet room will get you most of the way there. This matters more than lighting, backdrop, or fancy editing.
Build in accountability and action
Passive video-watching doesn't create results. Build in exercises, worksheets, assignments, or reflection prompts that require students to apply what they've learned. The courses with the highest completion rates are the ones that demand participation, not just consumption.
If possible, add community elements like a discussion forum, live Q&A sessions, or a cohort-based structure where students move through the material together.
The Final Bell: Your Online Academy Awaits
Building an online course used to feel like solving a complex puzzle where hosting, payments, and video players never quite fit together.
But as you can see from the steps above, FreshLearn has changed the game.
You now have the roadmap. You know how to build the curriculum, set the price, and design a checkout page that converts. The only thing missing is your unique expertise. Don’t let perfectionism hold you back; the best course is the one that is published and helps students.
To recap, here is why FreshLearn is the ultimate partner for your education business:
- 0% Transaction Fees: You keep every penny you earn on paid plans, unlike other platforms that take a cut of your hard work.
- Gamification Ready: Keep students addicted to learning with built-in badges, points, and rewards.
- Total Content Control: Whether you want to drip content weekly, enforce completion of lessons, or host live cohorts, the choice is yours.
- All-In-One Power: Sell courses, digital downloads, and masterclasses from a single dashboard without needing third-party tools.
There has never been a better time to digitalize and sell your knowledge online. Stop planning and start building your courses.
Start your free trial with FreshLearn.
FAQs
1. How long does it take to create an online course?
It depends on the scope, but most creators can launch a solid first course in less than a week. Don't aim for perfection. You can always improve it based on student feedback. Some creators even pre-sell their course and deliver it live to the first batch, then record and refine as they go.
2. Do I need to be an expert to create a course?
You don't need a PhD or twenty years of experience. You just need to know more than your target students and be able to help them get from point A to point B. Some of the best courses come from people who learned something recently and still remember exactly what it felt like to struggle with it. That relatability is valuable.
3. What equipment do I need to get started?
Less than you think. A decent USB microphone, your smartphone or laptop camera, and a quiet room will get you far. Clear audio matters most; students will forgive average video quality, but they'll click away from bad sound. You can upgrade your setup later once you're earning from your course.
4. Is FreshLearn good for beginners?
Freshlearn is designed for creators who don't want to wrestle with complex tech. The interface is intuitive; you can set up your courses without any coding knowledge, and it handles everything from hosting your content to processing payments. There’s AI to help you build the outline and even give you ideas for your courses. If you can use basic apps, you can use Freshlearn.
5. What features does Freshlearn offer for selling courses?
FreshLearn gives you a complete toolkit. You get customizable landing pages, email marketing, built-in payment processing, drip content scheduling, student analytics, community, and options for coupons and promotions.
It also supports memberships and digital downloads, if you want to expand beyond courses. Basically, it's built to handle both the teaching and the business side without needing a dozen different tools.

You might also like
- How To Become A Successful Online Course Creator?
- How To Write a Good Course Title (Guide + Examples)
- Best Practices to Follow While Creating Online Courses
- How To Name An Online Course + 10 Ideas To Stand Out
- A Guide on How to Price Your Online Course in 2024
- How to Create a DIY Home Video Setup for Online Courses
Hosted by